Feeds:
Posts
Comments

Double Batch Update

Before I get a sweet comment asking about when the next post will be coming, I’ll share with  you that I’m taking a break from Double Batch.

The blog will remain up, available for you to access any recipes you’d like to create.

I’m just taking a blogging vacation.  Maybe a month more, maybe six months more, maybe I won’t blog at all…although I doubt that.

And I’m not committing to a complete vacation.  If there’s a MUST SHARE recipe, well, you might find me taking a break from that vacation.  For now though, I just want a break.

Thanks so much for reading, and thanks especially to you email subscribers.  It means a lot that SO many people want updates and new recipes from this simple baker.

My measuring cup runneth over.

Mint Brownies

Yes, I’m sharing something with a little green in it just in time to celebrate St. Patrick, but these amazing brownies can be made any time of year.

Truthfully, I was nervous about making them.  You see my friend Denise already makes what I consider to be a perfect mint brownie.  So why would I waste my time making something that couldn’t possibly compete?  I dunno.  Curiosity I guess.

The good news is that this recipe is different enough from my friend’s that I now have two favorites.  The most notable difference is in the brownie layer: this recipe’s brownie layer is definitely more thick, which, in the end, yields a taller brownie.  But the taste…well, it’s equally as good as my first favorite.

I recently took these to a baby shower and knew they were a sure success when one of the attendees declared, “These are even better than the BYU mint brownies.”  You alumni know what she’s talking about.  The chocolate and mint really become best friends in this recipe and make the most delicious sweet treat.

So, bookmark, pin, or just get into your kitchen to make some mint brownies.  You won’t be disappointed!

Mint Brownies
adapted from SavvyGirl & Company

printer friendly recipe

For the brownie layer:
2 cups sugar
1 cup butter, softened
4 eggs
4 (1-ounce) squares unsweetened chocolate, melted and slightly cooled
2 ½ cups flour
¼ teaspoon salt
¼ teaspoon baking powder
2 teaspoons vanilla

Mint Frosting:
4 tablespoons butter, softened
2 tablespoons evaporated milk
2 cups powdered sugar
½ teaspoon peppermint extract
1 teaspoon vanilla extract
Few drops green or red food coloring

Glaze Topping:
6 tablespoons butter
1 cup semi-sweet chocolate chips
2 teaspoons vanilla

Heat oven to 325.  Grease a 9×13 baking pan.  In large bowl, cream sugar and butter until fluffy. Beat in eggs until well-blended; then add melted chocolate. Mix dry ingredients and add to creamed mixture along with vanilla.

Bake for 28-32 minutes, or until no imprint is left when touched or a toothpick inserted into the center comes out clean. Do not overbake.

Mix mint frosting ingredients until creamy and spread on cooled brownies. Refrigerate 1 hour.

For glaze, combine butter and chocolate chips in top of double boiler. Add the vanilla and blend thoroughly. Pour gently over the mint frosting and spread by tipping pan; refrigerate until glaze is set.

Recently, my friend’s husband hired me to make her birthday cake, requesting only that it be “chocolate and good.”

That meant I had lots of options.  Since I had recently created some chocolate cake goodness for the auction, I had an idea.

I used THIS cake as my inspiration, keeping the cake and ganache parts the same, but changing up the frosting a bit.

Instead of strawberries, I put about 15 Oreos in the food processor, pulsed them until finely ground, and folded them into the frosting.

Wow, that’s some creamy, Oreo deliciousness.

And the finished product doesn’t look too bad either.

A reminder too, that if you don’t have 3 6-inch pans like the cake recipe calls for, use two 8-inch ones.  Your result will still be amazing, just not quite as tall and skinny.

Cookies and Cream Swiss Meringue Buttercream
inspired by Sweetapolita

printer friendly recipe

Yield: ~5 cups

5 large, fresh egg whites (150 g/5 oz)
1 1/4 cups (250 g/9 oz) sugar
3/4 lb (3 sticks/340 g/12 oz) butter, cut into cubes and cool, but not cold
2 teaspoons (10 mL) pure vanilla extract
15 Oreos, finely crushed
pinch of salt

Wipe the bowl of an electric mixer with paper towel and lemon juice, to remove any trace of grease.

Add egg whites and sugar, and simmer over a pot of water (not boiling), whisking constantly but gently, until temperature reaches 150°F, or if you don’t have a candy thermometer, until the sugar has completely dissolved and the egg whites are hot.

With whisk attachment of mixer, begin to whip until the meringue is thick, glossy, and the bottom of the bowl feels neutral to the touch (this can take up to 10 minutes or so). *Don’t begin adding butter until the bottom of the bowl feels neutral, and not warm.

Switch over to paddle attachment and, with mixer on low speed, add butter cubes, one at a time, until incorporated, and mix until it has reached a silky smooth texture (if curdles, keep mixing and it will come back to smooth). *If mixture is too runny, refrigerate for about 15 minutes and continue mixing with paddle attachment until it comes together.

Add vanilla and salt, continuing to beat on low speed until well combined.

Add the crushed Oreos, and blend until combined.

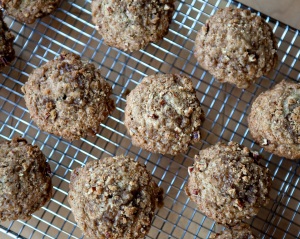
Banana Nut Crumb Muffins

When it comes to comfort food I’m typically an ice cream girl.  That pretty much cures whatever the current ailment seems to be. Why can’t carrot sticks or mixed greens be my go-to for comfort?

Last week I had a friend in definite need of some comfort food and her request was banana nut muffins.  Wow, she picked a good food for comfort.

I love a delicious recipe that can be put together with basic pantry items.  Sometimes you just need to bake up a little something, like I did last week, but don’t want to head off to the grocery store one more time.

Those ripening bananas are begging you to use them in this recipe!  Whether you need a little comfort or just a little something sweet, these are worth a try.
Oh, and I’m curious, what’s your go-to food for comfort?

Banana Nut Crumb Muffins
Adapted from Allrecipes

printer friendly recipe

For the muffins:
1 1/2 cups all-purpose flour
1 teaspoon baking soda
1 teaspoon baking powder
1/2 teaspoon salt
3 bananas, mashed
3/4 cup white sugar
1 egg, lightly beaten
½ teaspoon cinnamon
1/3 cup butter, melted
½ cup chopped pecans, toasted (optional but you would be crazy to leave them out!)

For the topping:
1/3 cup packed brown sugar
2 tablespoons all-purpose flour
1/8 teaspoon ground cinnamon
1 tablespoon butter
3 tablespoons chopped pecans, toasted (again, optional)

Heat oven to 375.  Lightly grease 12 muffin cups, or line with muffin papers.

In a large bowl, mix together 1 ½ cups flour, baking soda, baking powder and salt. In another bowl, beat together bananas, sugar, egg, cinnamon and melted butter. Stir the banana mixture into the flour mixture just until moistened. Fold in the pecans.  Spoon batter into prepared muffin cups.

In a small bowl, mix together brown sugar, 2 tablespoons flour and cinnamon. Cut in 1 tablespoon butter until mixture resembles coarse cornmeal. Add in chopped pecans.  Sprinkle topping over muffins.

Bake in preheated oven for 16 to 18 minutes, until a toothpick inserted into center of a muffin comes out clean.

I hate photographing inside with florescent lighting and having to use a flash.

Gross.

But it’s the best I could do.  By the time the cake was complete the sun was on it’s way down, a one year-old was incessantly pulling on my pant leg and we had to get this creation to the auction.

And that’s where the bad lighting and photographing took place.

So I made this cake for the silent auction/dinner we had at church on Friday.  The winner not only took home the cake, but also four more desserts of their choosing to be delivered once per week for the next month.  I’ve done something like this every year since we’ve been a part of the auction, and it’s always exciting to see who the winner is and what sweet treats I get to create for them.

One of the reasons I like this cake is its size: just six inches in diameter.  So it’s not a huge triple layer cake.  And each of those layers get cut in half so even though it’s a pretty tall cake, it’s still not huge.   If you don’t have six inch cake pans, however, just use two nine-inch pans and increase the baking time a little.

The frosting is amazing.  This was my first attempt at swiss meringue buttercream, and I’m SOLD.

So. incredibly. good.

(and not hard at all.)

While I have not sampled this amazing creation in its ‘sliced,’ fully assembled form, I can report that all of the components: cake, buttercream and glaze are DElicious. I had to sample to make sure the cake was worth auctioning, right?

I made just one adaptation from Sweetapolita’s original creation, replacing the coffee in the chocolate cake for just hot water.  Her awesome post can be found HERE.  And she has a WAY better picture too.

For ease of printing, I have created a printer friendly recipe of all three components of the recipe.

I just finished making a second one for a sweet husband who saw the cake at the auction and ordered one to surprise his wife for Valentine’s Day. I know, time is short, but you can get this made for someone you love!  Try it.

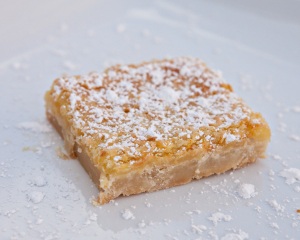
Lemon Bars

I know, not very Valentine-ish.

That’s coming on Friday (or maybe Saturday, we’ll see).  But these are definitely worth sharing.

A few weeks ago the weather turned cold and fearing that all of her citrus would freeze, my mom went outside on a frigid dark night and picked nearly everything off of her meyer lemon tree.  She had lots of fruit to share.  In fact, if you’re close by and want some lemons, let me know.  I’ve still got more than I can use.

I put those lemons to good use when my sweet friend Kristen came to town.  I had to take her a Double Batch treat, right?  Meeting her little girl Evelyn was way sweeter than any treat I could have made.  Nevertheless, these are pretty delicious.

Yes, you could buy a mix at the store and make lemon bars, but WHY when the assembly is so easy and quick and the results are SO. MUCH. BETTER.

Give them a try, and seriously, if you want a few lemons to get you started, let me know! 🙂

Lemon Bars
adapted from Lion House Desserts   

printer friendly version

1 ¼ cup butter
1 teaspoon vanilla extract
2 ¼ cups all purpose flour
½ cup powdered sugar

4 eggs
2 cups sugar
6 tablespoons lemon juice
zest from one lemon
4 tablespoons all purpose flour
1 teaspoon baking powder

To make the crust:
Heat oven to 350.  Put butter in mixing bowl and beat until softened.  Stir in vanilla.  Add the flour and powdered sugar and mix on low speed until just combined.  Spread the dough evening into a 9×13 pan.

Bake for 10 minutes or until the corners are light golden brown.  Remove from oven and pour filling on top of crust.

For the filling:
Mix together the eggs, sugar lemon juice, zest, flour and baking powder with a wire whisk or on low speed of a mixer.  It is important not to mix a lot of air into the filling.  Pour on top of the partially baked crust and bake for 30 to 35 minutes.

Remove from oven and all our to cool slightly before dusting with powdered sugar.  Cut into bars and serve.

There never seems to be enough time leading up to Christmas.

Even if we had an extra week, it would probably just be filled with more baking, more shopping and more parties.  Much as I’d like for that imaginary week to be spent sitting by the  fire, sipping hot chocolate and thinking of the true meaning of Christmas, the reality is that it would likely just be mostly filled with more hustle and bustle.

If you haven’t quite gotten around to making a sweet treat to share, to deliver or to just have around for family to nibble on here’s an EASY one for you.

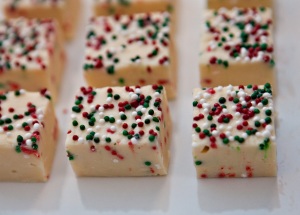
In about 2 hours you’ll have a white chocolate fudge that is a bit reminiscent of funfetti cake batter.  And your actual in-the-kitchen work time is about 15 minutes…or less.

Once again, a little bit of almond extract is just the perfect finishing flavor.

Oh, and if you’re like me and you’ve got a few friends who need a little gluten-free treat this holiday season, this one a perfect one to deliver!

Merry Christmas.  Thanks, as always,  for reading!

Funfetti Fudge
created by Victoria @ Pursuit of Hippiness
printer friendly recipe
1 14 ounce can sweetened condensed milk
3 ½ cups white chocolate chips
3 teaspoons vanilla extract
½ teaspoon almond extract
multicolored nonpareils and jimmies

Line an 8 or 9-inch square pan with foil.

Pour the sweetened condensed milk and white chocolate into a microwave-safe bowl. Heat for 2-3 minutes, or until white chocolate is almost completely melted. It is very important to NOT overheat the white chocolate.  Stir until completely blended, melted, and smooth.

Immediately add vanilla and almond extracts and combine thoroughly. Add a handful of jimmies (as much or little as you’d like), and fold in quickly.  Stirring too much will cause the jimmies to melt so don’t over do it.

Transfer to the prepared baking pan, sprinkle with nonpareils, and let set in the refrigerator.  Once set lift foil out of the pan, cut fudge and serve.

Colorful Spiral Cookies

I’ve been going through butter like it’s water lately.

These cookies are largely to blame.  I first made them as favors for our family who came to celebrate Noah’s birthday.

Didn’t they turn out great?

I liked the end result so much that I then made  a LOT some of the Christmas variety with red and white and green and white.  The Christmas version yielded a couple hundred cookies.

I’m always amazed how quickly a couple hundred cookies can just disappear once they are bagged by the dozen (or more) and shared with our dear friends.  Just like that…GONE.

But I loved sharing and making them.  I think it’s those darn  sprinkles (sorry, nonpareils for those foodies out there) that just finish the cookie off and make it cute.

You really can’t go wrong with almond extract. It makes this cookie taste like a little bit of sweet, buttery perfection.  But if almond isn’t your thing, try any other extract: coconut, strawberry, peppermint — whatever you want.

Colorful Swirled Cookies
slightly adapted from sprinklebakes.com

printer friendly recipe

2 cups cake flour, unsifted
½ teaspoon baking powder
¼ teaspoon salt
⅔ cup unsifted powdered sugar
¼ cup granulated sugar
2 ½ sticks unsalted butter
1 teaspoon vanilla
½ teaspoon almond extract, or other flavoring
2 tablespoons unsifted cake flour
food coloring
nonpareil decors (i.e. sprinkles)

Combine the flour, baking powder, salt and sugars in a food processor and process briefly to mix. Add the butter in pieces; process with on/off bursts until the mixture has the consistency of cornmeal. Add the vanilla and process until the mixture just forms a ball.

Divide the dough into 2 equal portions then return one of the portions to the food process. If you’ve got a food scale, use it to make sure your portions actually are even.  Add the almond extract, food coloring, and the extra tablespoons of flour to the processor and process until just incorporated.

Roll out each portion of dough between sheets of waxed paper. You want a rectangle about 11 × 8½ inches by ⅛ inch thick. Leave the dough between the sheets of waxed paper and slide onto a baking sheet. Refrigerate until firm, for at least 2 hours or up to 3 days.

Remove dough pieces from refrigerator. Pour the nonpareil decors into a shallow rectangular dish, such as a 9 × 13-inch pan.

Peel off the top sheet of waxed paper from both doughs. Brush the vanilla dough very lightly with water. Using the waxed paper, lift the colored, almondy dough and flip it onto the vanilla dough so they are stacked. Press with your fingertips to seal the two doughs together. Remove the top sheet of waxed paper and trim the edges even.

When the dough is just pliable (but still cold), roll up the dough(begin with the long side) like a jellyroll. As you begin to roll, gently curl the edge with your fingertips so you don’t get any air pockets as you roll dough into a log. As you roll, the vanilla portion may want to tear, pinch tears together as they happen and keep rolling.

After forming the dough into a log, throw away the waxed paper. Gently lift the log on top of the nonpareil decors in the dish and roll until the log is completely coated with decors. Wrap the log in plastic wrap and refrigerate until firm enough to slice (from 4 hours to a week, or freeze for up to 2 months; defrost in the refrigerator overnight before slicing).

Heat oven to 325 . To bake, slice the log into ⅛- to ¼-inch-thick cookies and bake on parchment-lined baking sheets for 15 to 17 minutes, until the cookies are no longer shiny on top and the bottoms of the vanilla portion are golden.

Buckeyes

This post comes with a shout out to my sister-in-law Becky, who lives entirely too far away — in Ohio.  Man, we miss her.

She got married this past summer to and Ohio State grad, which means she too is now a Buckeye.  It’s funny how all of us now are just a little more tuned into Buckeye life: sports scores, events and even controversy (um, hello Tresselmania).  While most of us in the family still claim to bleed blue, I think we like that Becky and Terry have made us fans of another university as well.  Although I don’t think all of us will be carrying a real buckeye around in our pocket like a certain someone sometimes does. 🙂

We attended the annual family Christmas party over the weekend, so I made Buckeyes for the occasion.  I mean, if part of our family can’t be there, they should at least be represented, right?  Even if it is only in dessert.

I’ve wanted to make this recipe for a while.  It comes from the second cookbook from those genius bakers at Baked in New York City.  Heaven help me the next time I get to New York.  I’ve got a list of bakeries to visit that is far too long.  And Baked is at the top.

If you look at other recipes for Buckeyes, they typically call for twice the amount of sugar that this one does.  This recipe also includes crushed graham crackers, which deviates from the ‘traditional’ one.  But you know what?  The result is phenomenal.

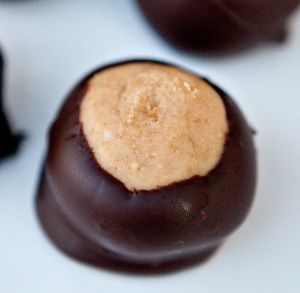
Not just delicious.  Like over the top awesomeness.  It’s such a good blend of peanut butter and chocolate.

I struggle when it comes to dipping things in chocolate, so after reading a few tips from different bloggers I inserted toothpicks into each peanut butter ball and put the tray in the fridge.  After about 20 minutes the peanut butter balls were dipped in chocolate and the toothpick was removed.  Once the chocolate hardened I just barely got my fingertip wet and rubbed it on the spot where the toothpick had created a hole.  Voila!  The hole was gone.

I’m leaving all of that out of the printable recipe, because you’re probably a lot more skilled at dipping than me.  But, if not, this is a pretty foolproof method.  Think ‘dipping for dummies.’

Buckeyes
Slightly adapted from Baked Explorations

1/4 cup (2 ounces) cream cheese, softened
1 1/2 cups smooth peanut butter
1 cup graham cracker crumbs
1/4 teaspoon salt
1 teaspoon vanilla extract
3 cups powdered sugar
10 tablespoons unsalted butter, melted and cooled
12 ounces dark chocolate (60 to 72%), coarsely chopped

Make the filling: In the bowl of an electric mixer, beat the cream cheese and peanut butter together until combined. Add the graham cracker crumbs and beat for 10 seconds. Add the sugar, vanilla  and butter, and mix on the lowest speed until it stops floating off everywhere, then increase the speed until the ingredients are combined. Scrape down the whole bowl well, then mix again. The mixture will be quite sturdy and a little dry — perfect for shaping. Set it aside while you prepare the coating.

Make the coating: Melt the chocolate either over a double boiler, stirring until it is completely smooth or in a microwave in 30 then 10 second increments, stirring before you start it again until it is completely smooth. Let it cool a bit while you shape the peanut butter centers.

Assemble the candies: Line a sheet pan with parchment paper. Scoop out slightly more than one tablespoon’s worth of filling (I used my smallest cookie dough scoop). Use your hands to form it into a ball. Place the ball on the prepared sheet and repeat the process until all of the candies have been shaped. They can sit close to each other but make sure they are not touching.

Using a fork or large skewer, dip each ball into the chocolate and roll it about so that almost the entire candy is coating, leaving a small circle uncoated.

Chill the buckeyes until they are set, about 30 minutes.

Vanilla Bean Cake

We celebrated this little cake eater’s first birthday on Saturday.

He did not disappoint when it came to diving into that cake.

Can you blame him? It was delicious!

Little Noah got a three layered 6-inch round cake, and I made an 8-inch cake for the rest of us.

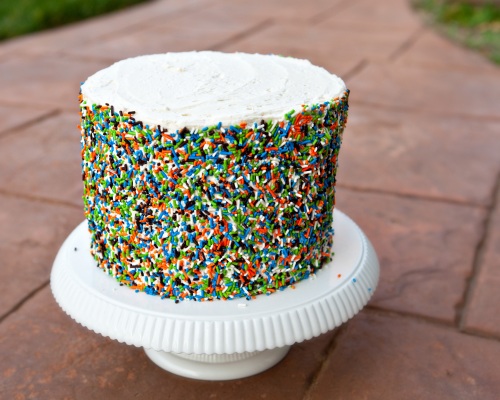
The cake was filled with one of my favorites: instant fudge frosting, and then frosted with a basic vanilla buttercream.  Since there’s butter in that buttercream (duh!) the frosting was a little yellow.  I wanted a white contrast with the sprinkles so I added some Americolor white food coloring.  Did you know they make white food coloring?  It really does make a difference.

I ordered up a bunch of sprinkles from Fancy Flours (love them!) and made my own custom mix that matched the colors of the invitation.  It was an embarrassingly easy way to decorate, with results that I absolutely loved.

Back to the cake for a second. Simply put, it is moist, dense and delicious.  Thin slices seem to go a long way.  If you’re looking for a white cake to bake, this may just become a new favorite.

Vanilla Bean Cake
Yield: three 8-inch round layers

printer friendly recipe

1 1/2 cups unsalted butter, room temperature 2 2/3 cups (540 g) granulated sugar
9 egg whites room temperature
4 1/2 cups all-purpose flour
2 tablespoons baking powder
1 teaspoon salt
2 cups buttermilk
1 vanilla bean, split & scraped
1 teaspoon pure vanilla extract

Heat oven to 350.  Butter three 8-inch round cake pans, line with parchment rounds, and dust with flour, tapping out the excess.

In a stand mixer fitted with the paddle attachment, beat the butter and sugar on medium-high speed until lighter in color and slightly increased in volume, 3 to 5 minutes. Lower the speed to medium and add the egg whites gradually, mixing until fully incorporated.

Sift the flour, baking powder, and salt into a medium bowl. Mix vanilla extract and scrapings from the vanilla bean into buttermilk.  Alternate dry ingredients and buttermilk into creamed mixture, beginning and ending with dry ingredients. Mix until just incorporated or finish by hand gently.

Divide the batter evenly between the prepared pans. If possible, weigh the batter in each cake pan on a digital kitchen scale to ensure even layers.  Smooth with small offset palette knife, and bake for about 30 minutes. Cake is done when toothpick or skewer comes clean.

Let pans cool on wire rack for 10 minutes, then invert cakes onto racks, gently, peeling away parchment rounds. Let cool completely.